Today I put together this super easy and fun DIY floral headboard, or floral crown for my headboard. This will be a key part in our new botanical bedroom design, and was the quickest and easiest DIY, so we decided to kick off our project with this piece! I promise you this is the easiest hack you’ll ever do in your life, if you have a fabric headboard like ours, and it is flush to the wall. This piece looks great in a botanical bedroom, a child’s bedroom or any eclectic or natural style.

Contents:
The problem
We moved into my new build over a year ago now, and one place that we still haven’t completed is our master bedroom. During this year we have instead decided to focus on areas of the house where guests are more likely to spend time, so we can enjoy the space with family and friends. However, we’re getting sick of being faced with the starkness of our bedroom each night, so this month getting the bedroom sorted is our main priority!
The only thing we did do upon moving in was buy our sage green ottoman bed frame from Yark beds. We had been searching high and low for a bed and mattress that would arrive within a week, as our completion day had happened earlier than expected (a rare occurrence!) and we stumbled upon this one from Yark. The price was amazing, and it came in a gorgeous sage green colour – which is both mine and my husbands favourite colour, so we knew the stars had aligned!
Since purchasing the bed, we haven’t done much else. All the other furniture in the space is second hand, and we have made our lives slightly difficult by choosing this bed. Sage green doesn’t match with every colour or style, so we’ve had to think carefully about our colour scheme. Another issue is that our bed’s headboard is pretty high, whilst the ceiling is relatively low. This left us with some awkward white space above our bed, enough to be noticeable but not enough to hang a shelf or a picture frame without looking pretty awkward.

Our botanical bedroom vision
After a year of living in the space, we have finally decided on what we want to do. We’ve kept the rest of the house quite neutral, but as it’s our master bedroom, we think it’s an opportunity to try out a new style that will help us to feel relaxed and happy. We also need to ensure the theme fits with our bed, the one piece of furniture that we know we love and want to keep. Enter the botanical bedroom!
Sage green looks stunning with pink, and the colours are common in floral bouquets. We love the look of plants, natural materials and flowers so a botanical theme works really well for our tastes and the existing bed. We’re planning on having a large botanical mural on the wall behind the wall, with pink accents throughout the room, brass hardware and LOTS of plants and flowers, including a floral headboard!
A floral headboard adds some interest and height to the blank space above the bed, and will look beautiful with the backdrop of a botanical mural. I can’t wait to see the space come together, and will be documenting every stage so keep your eyes peeled for the updates! We’re kicking off the redesign with the floral headboard because… it’s the easiest and cheapest bit to do!

Creating a floral headboard
Step 1
Figure out your colour scheme – if you are aiming for a botanical bedroom greens and pinks are usually your go-to colours, however if you’re going for more of a floral vibe then deep purples and blues look gorgeous and add some drama! For a childs bedroom, as many colours as possible (without looking clashy or tacky) – as lots of bright colours can help to stimulate a child’s senses.
Once you have chosen your colour scheme – time to go shopping! We’re doing this with artificial flowers because… it’s a recession and nobody has the time nor money to replace this arrangement every week!


I did a bit of shopping around for my artificial flowers, and ended up getting artificial flowers from Dunelm and The Range. To read my honest review on Dunelm artificial flowers, B&M artificial flowers and The Range artificial flowers, click here. If you’re interested in the same flowers that I purchased, you want to get The Range rose garland, The Range floral bouquet, Dunelm Peonie bouquet and Dunelm Fern.


Once you have bought your flowers, buy a long roll of chicken wire like this one from Amazon. You want the length to be around the same length of your bed – this is likely to be around 1.5 for a single bed, up to 2.8m for a super king size bed. You’ll also want to get some hooks to hang the headboard on behind the bed – if you’re renting (or just don’t want to ruin your walls) get some sticky back clear hooks from Wilko (£2.50!) to use in the final parts of the project.
Step 2
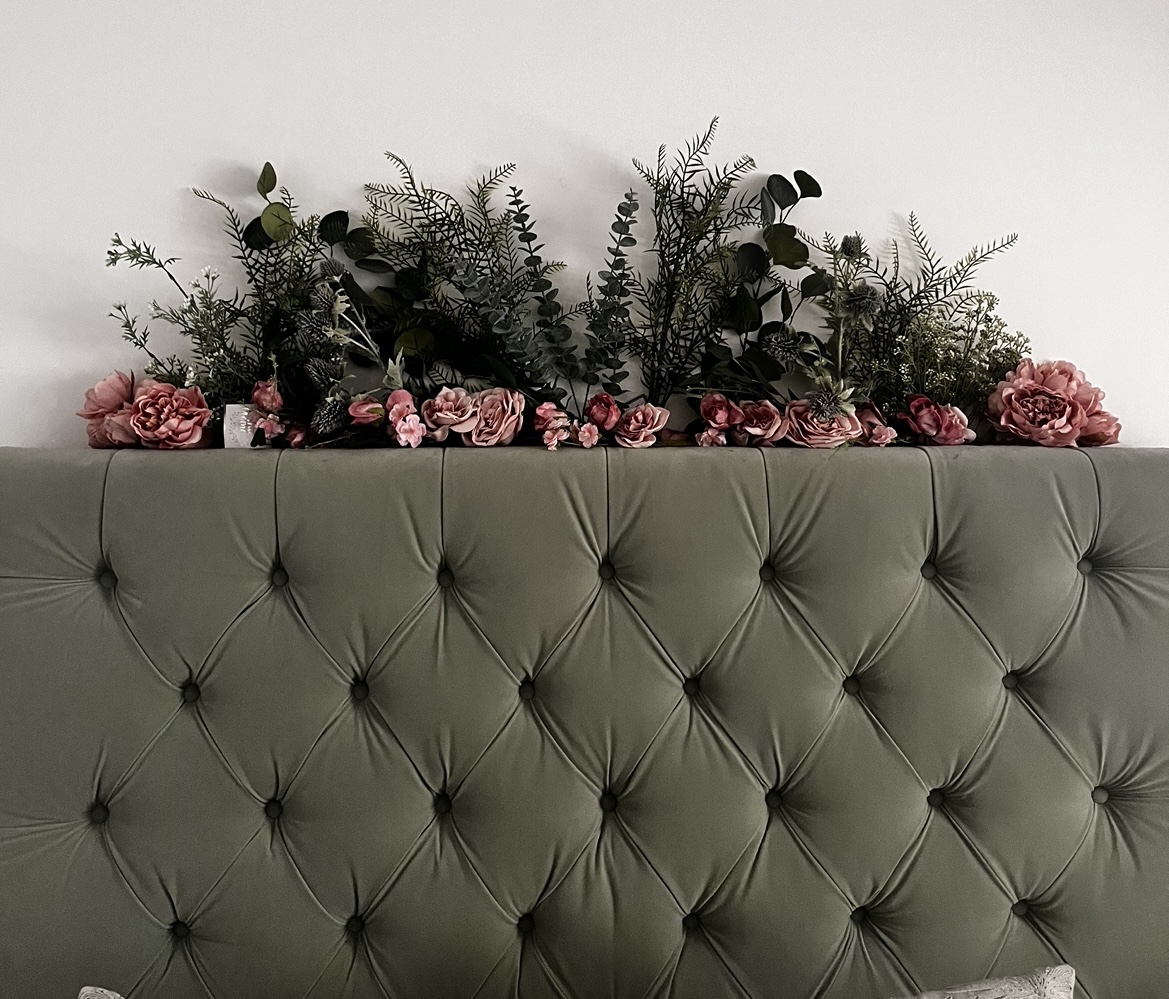
Once you have the flowers you want, place them on a flat surface and arrange them into position. If you want a neater look, you’ll want to place the flowers in a relatively symmetrical order, with smaller flowers on the edges and larger stems in the middle of the arrangement. You then want to add the bushier bits around, also following an inverted ‘V’ shape, so the floral headboard arrangement does not look too sparse.

I prefer to have the brighter colours along the bottom edge of the arrangement, with a few flowers dotted higher up, but it is up to you and your tastes how you arrange the flowers within the stems, and what the ratio of flowers to stems is. Once you are happy with your arrangement, measure the width of the arrangement. Make sure the width is not longer than the bed-frame width itself.
Step 3
Take your chicken wire and cut it to the width of your arrangement. Cut it to the appropriate length as well, depending on how bushy you plan your floral headboard to be. For my case, 4 rows of chicken wire was more than enough to get going with – you may be fine with 2 or you may want more levels to your arrangement – use your own judgement for this.

Take the bottom row of artificial flowers for your arrangement and put them in the bottom rung of the chicken wire. Push the stem of the flower through until it’s head is up against the chicken wire, then bend the stem slightly so that it stays in place. Repeat this step for each row of flowers/stems, adjusting until you have the desired affect. You want to ensure the flowers are arranged in a way that none of the chicken wire is visible.
Step 4
Once you are happy with the look of the arrangement, it’s time to hang it up! Attach your plastic hooks so they are slightly above your headboard, and hang one of the (probably middle rows) of your chicken wire to the hooks, so that the stems of all rows are hidden behind your bed.

And you’re done! The good thing about this project is that you can keep adding and adjusting until you’re happy. Personally I’m planning on getting a few more stems and flowers for the middle section, however I’m happy with the end result already – it’s made such a difference to the room!
Our next step is going to be adding our botanical bedroom wall mural – we’ve just ordered a stunning one from Dunelm which should be arriving (and up!) next week. I’m so excited to see this room come together, one piece at a time!
2 responses to “£30 Floral Headboard Hack for a Botanical Bedroom”
[…] offer – not ideal if you’re planning a big piece like an artificial flower wall or an artificial floral headboard! For that reason, I’ve had to give B&M artificial flowers a low score for […]
[…] In terms of style – I knew that I wanted a kingsize bed with a massive chesterfield/buttoned headboard. At Yark they let you tailor your design, so you can opt for any of the headboards offered with any colour and size. The headboard we got is around 140cm high, which makes a nice dramatic impact on an otherwise bare room (as pictured, I eventually created a little flower crown to put on top, you can read more about that here). […]